Registering & Displaying A Sidebar

Registering a sidebar gives our theme an area where dynamic content can be added by Widgets and managed by the site owner using a drag an drop interface. This can include menus, custom HTML, Images and additional features introduced by Plugins.

In this post we’ll register a sidebar, that will then be assigned dynamic widgets and displayed on our site’s footer.

functions.php

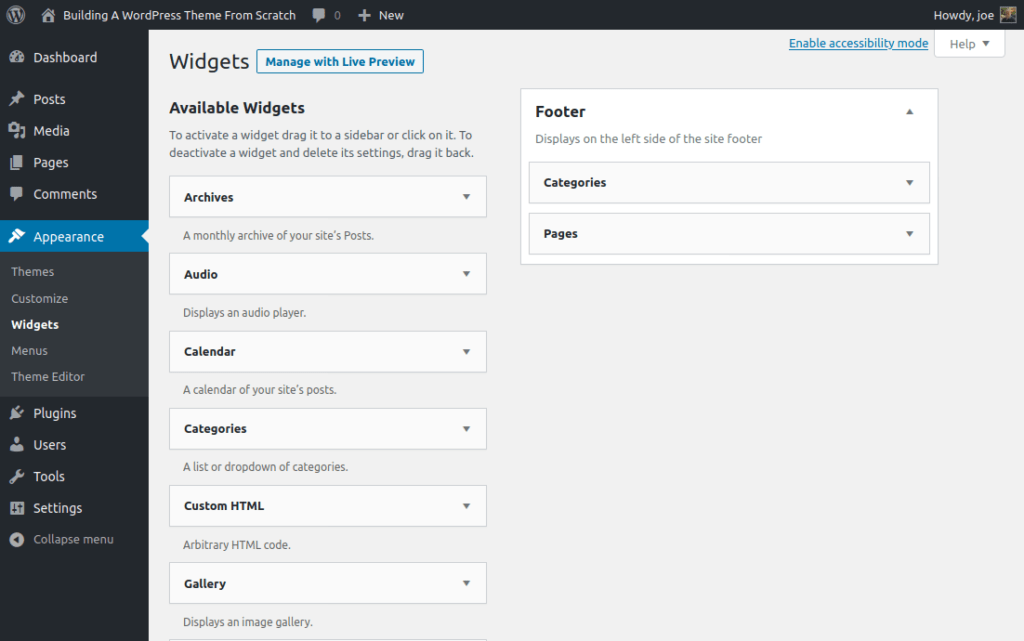
Registering a sidebar adds the Widgets option to our Appearance menu which didn’t appear previously. By registering a sidebar we also enable this feature in the WordPress dashboard.

WordPress dashboard Widgets screen
WordPress Dashboard > Appearance > Widgets

Registering a sidebar
Register a Sidebar in functions.php

// Register a Sidebar
        register_sidebar(
                array(
                        'id'            => 'footer',
                        'name'          => __( 'Footer', 'textdomain' ),
                        'description'   => __( 'Displays in the footer on the left side', 'textdomain'),
                )
        );

View the complete functions.php file. Above is the portion added in this tutorial.

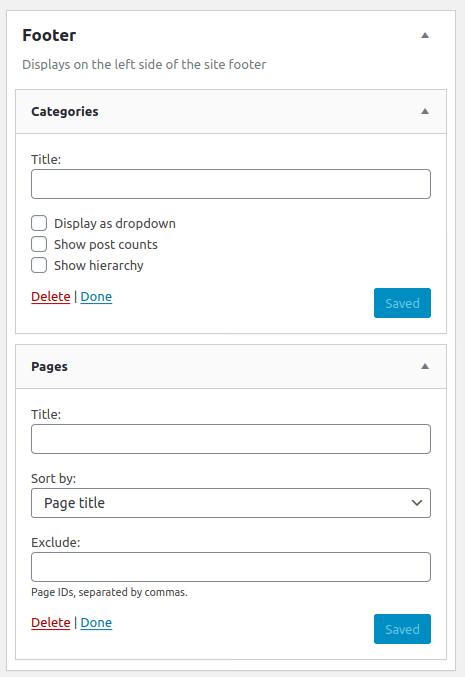
Once we’ve registered the sidebar we can assign content to our Footer widget.

Footer Widgets
Assigning Categories and Pages to the Footer widget

footer.php

Next we’ll want to display that sidebar so we’ll use the conditional tag is_active_sidebar() to check if any widgets have been assigned. If that check passes WordPress will display the widgets. By running a check such as this we prevent WordPress from adding empty HTMLtags to the page. This also helps us with accessibility later.

Assigning Widgets

// Assigns Footer Widget
if ( is_active_sidebar( 'footer' ) ) {
        dynamic_sidebar( 'footer' );
}

View the complete footer.php file. Above is the portion added in this tutorial.

The Desired Result

un-styled theme
Our theme is now ready to be tested for accessibility.

With our post content, two menus, and sidebar in place we’re ready to plan and test for accessibility before moving onto the design.


Registering & Displaying Menus

Adding or Registering menus to a WordPress website has frequently been a challenge which is why I believe it deserves its own post as we learn about register_nav_menus() then adding those Navigation Menus to our theme.

At first glance the process appears simple, add a function to functions.php to “register” the menus.

functions.php

// Register Header and Footer Menus
function scratch_jd_theme_setup() {
	register_nav_menus(
		array( 
			'header-menu' => __( 'Header', 'scratch-jd' ),
			'footer-menu' => __( 'Footer', 'scratch-jd' ),
		)
	);
}
add_action( 'after_setup_theme', 'scratch_jd_theme_setup' );

Next use wp_nav_menu() in our template (or templates) to display the menu.

header.php

wp_nav_menu( array( 'theme_location' => 'footer-menu' ) );

footer.php

wp_nav_menu( array( 'theme_location' => 'header-menu' ) ); 

These code samples above are in addition to the files used in Building a Basic WordPress Theme.

If you’d like to glance the complete files visit this snippet.

Where registering menus gets gets tricky is if there is a mismatch between the registration and the template file that hooks it into the page. If wp_nav_menu() doesn’t find the desired menu WordPress displays a fallback… In this case the only page on my website Sample Page. Since this isn’t expressed as an error we’re not really sure what’s wrong here. Only that its not the expected result.

These aren’t the the menus you are looking for

However, if things work outour assigned menu will display properly.

Assigning our menu to Header and Footer Display locations

The assigned menus we’re expecting

Template Tags

Until thiss point our theme hasn’t generated any html beyond a paragraph tag in the Welcome post.

However, wp_nav_menu() is one of many Template Tags that WordPress provides by to help designers and developers customize our website.

developer tools inspection of a WordPress menu.
Not just unordered lists and list items are inserted but custom classes as well.

In the image above which inspects the menus list links you’ll note a class of current_page_item which could be used to differentiate the current page as it appears in the menu. All without custom JavaScript. A feature that will be handy later when we plan our our design and accessibility features.


Building A Basic WordPress Theme

Illustration: A file manager containing three files.

Creating a WordPress theme only requires three files. style.css, index.php, functions.php. However since we’ll be needing them later lets include header.php and footer.php.

Some of the code samples get a little busy in this section so I’ve provided them in a Bitbucket snippet for easier reading and download.

Tip: Before beginning consider setting wp_debug to true in wp-config.php this will expose any errors or warnings encountered during your theme building process.

Configuring WP_DEBUG to true

style.css

WordPress relies on style.css to provide basic information about your theme. Some fields are required while others are optional.

/*
Theme Name: Scratch JD
Theme URI: https://joseph-dickson.com/scratch-jd
Author: Joseph Dickson
Author URI: https://joseph-dickson.com
Description: Scratch is a no thrills theme.
Version: 1.0.0
License: GNU General Public License v3
License URI: https://www.gnu.org/licenses/gpl-3.0.en.html
Text Domain: scratch-jd
*/

functions.php

This is where we enqueue our theme’s stylesheet and run a simple setup function to check that our theme is calling its own functions.

<?php
/**
 *	@since Scratch JD 1.0.0
 *
 * 	Proper way to enqueue scripts and styles
 */

function scratch_jd_scripts() {

	wp_enqueue_style( 'scratch-jd', get_stylesheet_uri() );
}

add_action( 'wp_enqueue_scripts', 'scratch_jd_scripts' );

header.php

<?php
/**
 * The template for displaying the header
 *
 * @link https://developer.wordpress.org/themes/basics/template-files/#template-partials
 *
 * @since Scratch JD 1.0.0
 */
wp_head();

footer.php

<?php
/**
 * The template for displaying the footer
 *
 * @link https://developer.wordpress.org/themes/basics/template-files/#template-partials
 *
 * @since Scratch JD 1.0.0
 */
wp_footer();

index.php

The index.php file is a primary fallback for all WordPress templates. It can be overridden by more specific files by using the template hierarchy.

Because I promised we’d keep things simple index.php will only contain four WordPress hooks and the WordPress loop.

The Loop: Retrieves a post’s content from the WordPress database and displays it on the current post, page, index or archive.

the_title(): Retrieves a post’s title from the database and allows for adding html around it

the_content(): Retrieves the post’s content from the database

get_header(): Retrieves header.php from your theme.

get_footer(): Retrieves footer.php from your theme.

<?php
// Get the Header
get_header();

// The Loop
if ( have_posts() ) {
        while ( have_posts() ) {
                the_post(); 

                // Display the post title and HTML              
                the_title();
                
                // Display post content
                the_content();
                
        } // end while
} // end if

// Get the Footer
get_footer();

Archiving and Testing

Once all the files are ready we can either copy them directly to our localhost and test live or install it.

Copying the folder to your localhost in Ubuntu

sudo cp scratch-jd/ /var/www/html/scratch/wp-content/themes/ -r

Copy your files to localhost for testing

Create a Zip Archive in the bash terminal

zip -r scratch-jd .

Creating a zip archive in bash
Creating a zip archive

Uploading and activating scratch-jd.zip and the desired results.

Uploading and activating the theme

Albeit not very interesting this theme technically works, It pulls in both the header and footer scripts a cascading stylesheet as well as The Loop.

In the next post we’ll learn about creating navigational menus.