Building A Basic WordPress Theme

Illustration: A file manager containing three files.

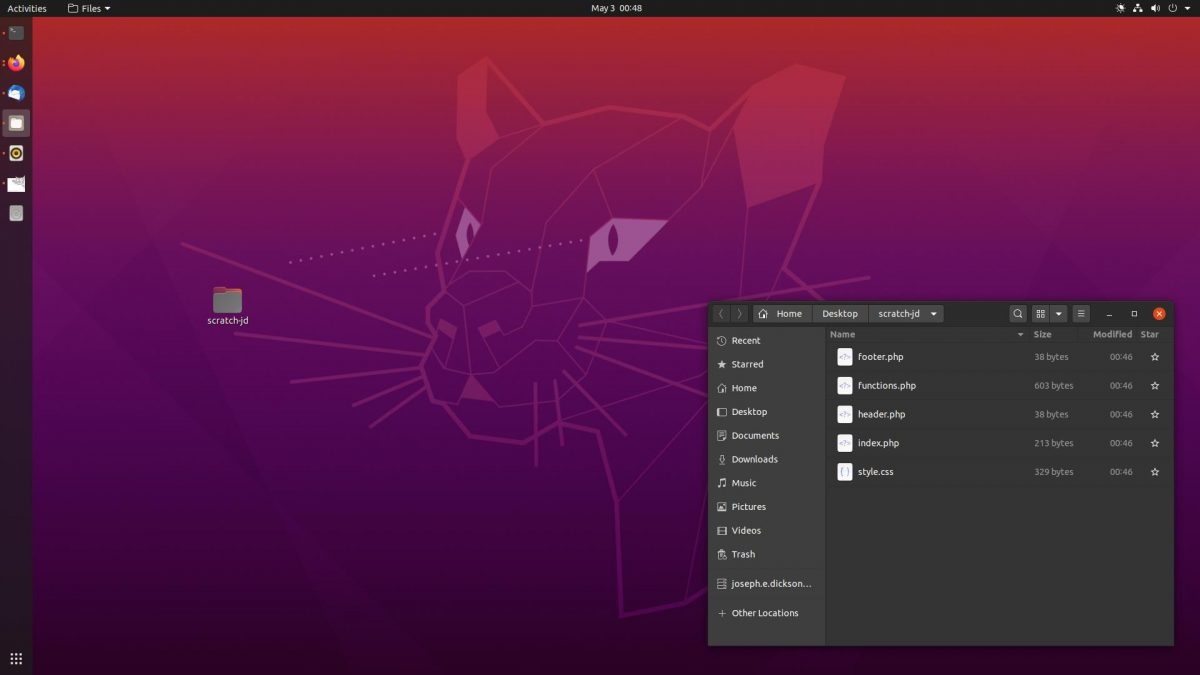
Creating a WordPress theme only requires three files. style.css, index.php, functions.php. However since we’ll be needing them later lets include header.php and footer.php.

Some of the code samples get a little busy in this section so I’ve provided them in a Bitbucket snippet for easier reading and download.

Tip: Before beginning consider setting wp_debug to true in wp-config.php this will expose any errors or warnings encountered during your theme building process.

Configuring WP_DEBUG to true

style.css

WordPress relies on style.css to provide basic information about your theme. Some fields are required while others are optional.

/*
Theme Name: Scratch JD
Theme URI: https://joseph-dickson.com/scratch-jd
Author: Joseph Dickson
Author URI: https://joseph-dickson.com
Description: Scratch is a no thrills theme.
Version: 1.0.0
License: GNU General Public License v3
License URI: https://www.gnu.org/licenses/gpl-3.0.en.html
Text Domain: scratch-jd
*/

functions.php

This is where we enqueue our theme’s stylesheet and run a simple setup function to check that our theme is calling its own functions.

<?php
/**
 *	@since Scratch JD 1.0.0
 *
 * 	Proper way to enqueue scripts and styles
 */

function scratch_jd_scripts() {

	wp_enqueue_style( 'scratch-jd', get_stylesheet_uri() );
}

add_action( 'wp_enqueue_scripts', 'scratch_jd_scripts' );

header.php

<?php
/**
 * The template for displaying the header
 *
 * @link https://developer.wordpress.org/themes/basics/template-files/#template-partials
 *
 * @since Scratch JD 1.0.0
 */
wp_head();

footer.php

<?php
/**
 * The template for displaying the footer
 *
 * @link https://developer.wordpress.org/themes/basics/template-files/#template-partials
 *
 * @since Scratch JD 1.0.0
 */
wp_footer();

index.php

The index.php file is a primary fallback for all WordPress templates. It can be overridden by more specific files by using the template hierarchy.

Because I promised we’d keep things simple index.php will only contain four WordPress hooks and the WordPress loop.

The Loop: Retrieves a post’s content from the WordPress database and displays it on the current post, page, index or archive.

the_title(): Retrieves a post’s title from the database and allows for adding html around it

the_content(): Retrieves the post’s content from the database

get_header(): Retrieves header.php from your theme.

get_footer(): Retrieves footer.php from your theme.

<?php
// Get the Header
get_header();

// The Loop
if ( have_posts() ) {
        while ( have_posts() ) {
                the_post(); 

                // Display the post title and HTML              
                the_title();
                
                // Display post content
                the_content();
                
        } // end while
} // end if

// Get the Footer
get_footer();

Archiving and Testing

Once all the files are ready we can either copy them directly to our localhost and test live or install it.

Copying the folder to your localhost in Ubuntu

sudo cp scratch-jd/ /var/www/html/scratch/wp-content/themes/ -r

Copy your files to localhost for testing

Create a Zip Archive in the bash terminal

zip -r scratch-jd .

Creating a zip archive in bash
Creating a zip archive

Uploading and activating scratch-jd.zip and the desired results.

Uploading and activating the theme

Albeit not very interesting this theme technically works, It pulls in both the header and footer scripts a cascading stylesheet as well as The Loop.

In the next post we’ll learn about creating navigational menus.


WordPress Development with LAMP

While I choose to develop for WordPress using LAMP there are alternatives such as MAMP, WAMP, XAMPP as well as services that provide a sandbox development environment such as Desktop Server and Local by Flywheel. This post only covers setting up WordPress using Ubuntu 20.04 Focal Fosa.

Installing WordPress for Local Development with LAMP

bash terminal illustration

LAMP must be installed prior to these steps I enjoy using this old tutorial. However, package names for PHP and others are outdated, be sure use the latest packages available for Ubuntu 20.04 Focal Fosa.

Begin by creating a folder in your hosting environment

Feel free to substitute scratch for your own folder name.

cd /var/www/html/
sudo mkdir scratch
cd scratch/

Creating a folder named scratch
Creating a folder named scratch to contain our WordPress website

Download and expand an archive of the latest version of WordPress.

sudo wget -c http://wordpress.org/latest.tar.gz
sudo tar -xzvf latest.tar.gz

Downloading and expanding the WordPress archive

After everything expands the files will be contained in a folder named wordpress. Now we can delete latest.tar.gz and move the files into our scratch folder then remove the wordpress folder itself.

Warning: This is a good time to warn you about the dangers of the rm command. It is a command to delete files, while superuser you can remove an entire directory and its contents so be sure you are in the scratch directory and targeting the correct wordpress folder.

sudo rm latest.tar.gz
cd wordpress/
sudo mv * ..
cd ..
sudo rm -rf wordpress/

Removing the download archive and moving our WordPress files.

Setting folder permissions

This next couple commands will provide permission for WordPress to operate with read and write access in the scratch folder.

sudo chown -R www-data:www-data /var/www/html/scratch/
sudo chmod -R 755 /var/www/html/scratch/

Setting up folder permissions for WordPress

Create a MySQL database for WordPress

sudo mysql -u root -p

Change your database name to match your naming convention. and use a unique and secure password in place of password used here.

CREATE DATABASE wp_scratch;
CREATE USER 'scratch'@'localhost' IDENTIFIED BY 'password';
GRANT ALL PRIVILEGES ON wp_scratch.* TO 'scratch'@'localhost';
FLUSH PRIVILEGES;
EXIT;

Creating a WordPress database and a unique user

Configure Apache for WordPress

sudo vim /etc/apache2/apache2.conf

Editing the apache2.conf file to allow pretty permalinks.

<Directory /var/www/html/scratch/>
        Options Indexes FollowSymLinks
        AllowOverride All
        Require all granted
</Directory>

Configure Apache
Configure Apache

Run the following commands in the terminal to finish setting up Apache and then restart it along with MySQL

sudo a2enmod rewrite
sudo systemctl restart apache2.service
sudo systemctl restart mysql.service

Finish setting up Apache and restart services

If everything worked correctly you now have a localhost ready for WordPress development in using LAMP.

Visit http://localhost/scratch/ or the folder you used in place of scratch to complete the WordPress setup using the information you provided to MySQL.

Complete your WordPress Installation

Warning: If this server is intended to be used in a production environment use secure and unique passwords.


Building a WordPress Theme From Scratch

I’m a fan of using WordPress to build custom websites. So I’ve decided to start a tutorial series and share how I go about building a theme from scratch. No frameworks or starter themes.

The Sketch

Sketch of the theme's design
The layout sketch

Before even setting up my development environment I sketch a very basic layout for my theme. In this series we’ll use a simple layout that includes the following areas.

  • Site header & a primary navigation menu
  • Content area
  • Footer with secondary sidebar menu and a dynamic sidebar for widgets

The Outline

At any point you can review download or clone the repository which will possibly be a step or two ahead of the most recent post in the series.

All content will be offered free as in free beer as well as free software. The theme template files for Scratch JD are licensed under GPL3 and all content in this tutorial series is provided under Creative Commons Zero / Public Domain.